Diving deeper into Cellframe: Python SDK and Plugins pt. 3
Category: Guide
This article was originally written by Mika Hyttinen. Medium link: https://medium.com/@mika.hyttinen
Ok folks, time for another “let’s do some experimental tests on Cellframe Python SDK”.
You probably checked my article about t-dApps for Cellframe ecosystem so in this article we’ll be taking a look the server and client side plugins for Cellframe node.
A client and server plugin could be used in multiple different ways. You could for example provide some data to user from the server side based on different conditions (eg. amount of tokens in wallet, paid subscription etc.)
By the way, there are some examples available at Cellframe Gitlab for client and server plugins so we’ll be using them as the base for our testing.
Let’s go!
. . .
About Cellframe
Cellframe is an ambitious third generation blockchain project and few people (me included) have already started to talk about it as the next Polkadot or Kusama.
This project is, however, more service oriented and has some advantages compared to Polkadot/Kusama (eg. post-quantum cryptography, 2-level sharding, P2P cross-chain operations).
Cellframe is written in C (which will make it FAST and portable), and it has an SDK for C and Python at the moment. More supported languages are coming in the future.
I really recommend visiting their website (https://cellframe.net) and read their whitepaper!
. . .
Client connection to Server
So let’s take a look at the client plugin first. The client plugin could be used in multiple different ways for establishing connection to server side plugins, but in this example I’m running everything on a local Cellframe node installation.

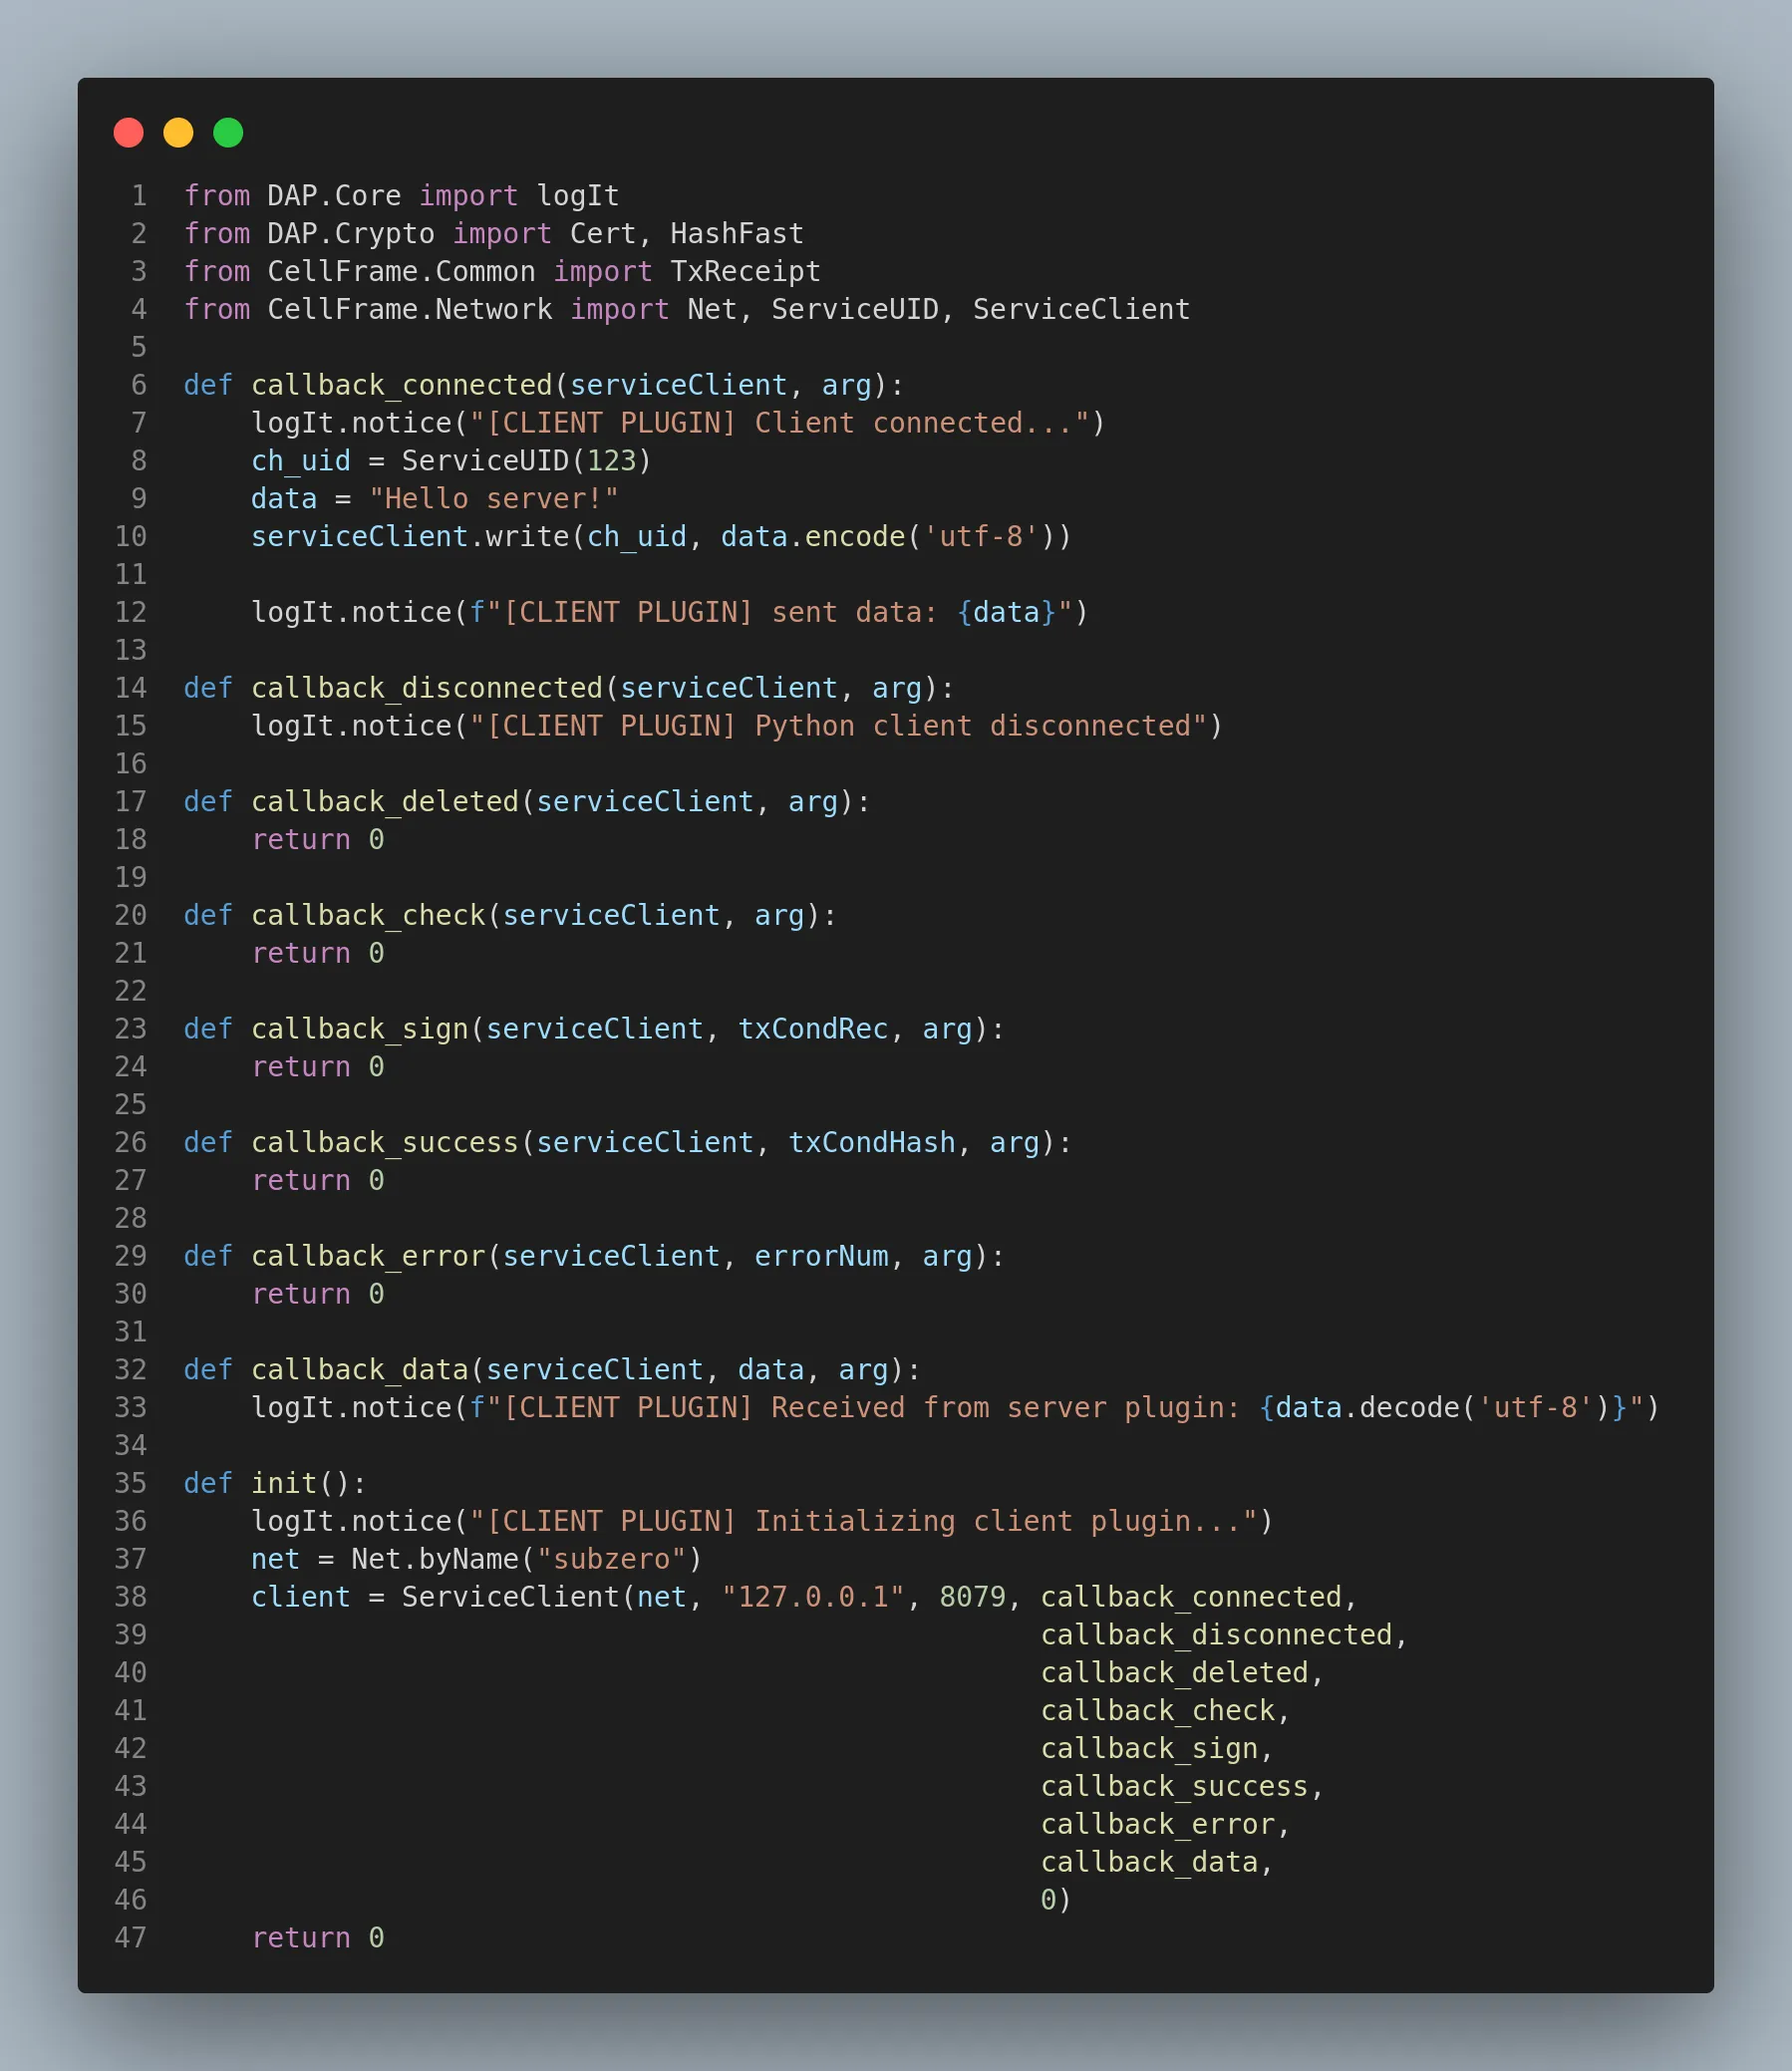
I added some basic logging to see what’s happening behind the scenes when this client plugin connects to the server plugin. If we take a look on the log files of Cellframe node, we should see something like this:
[05/07/22-07:35:45] [ * ] [libdap-python] [CLIENT PLUGIN] Client connected...
[05/07/22-07:35:45] [ * ] [libdap-python] [CLIENT PLUGIN] sent data: Hello server!
Now, let’s look at the server plugin part:

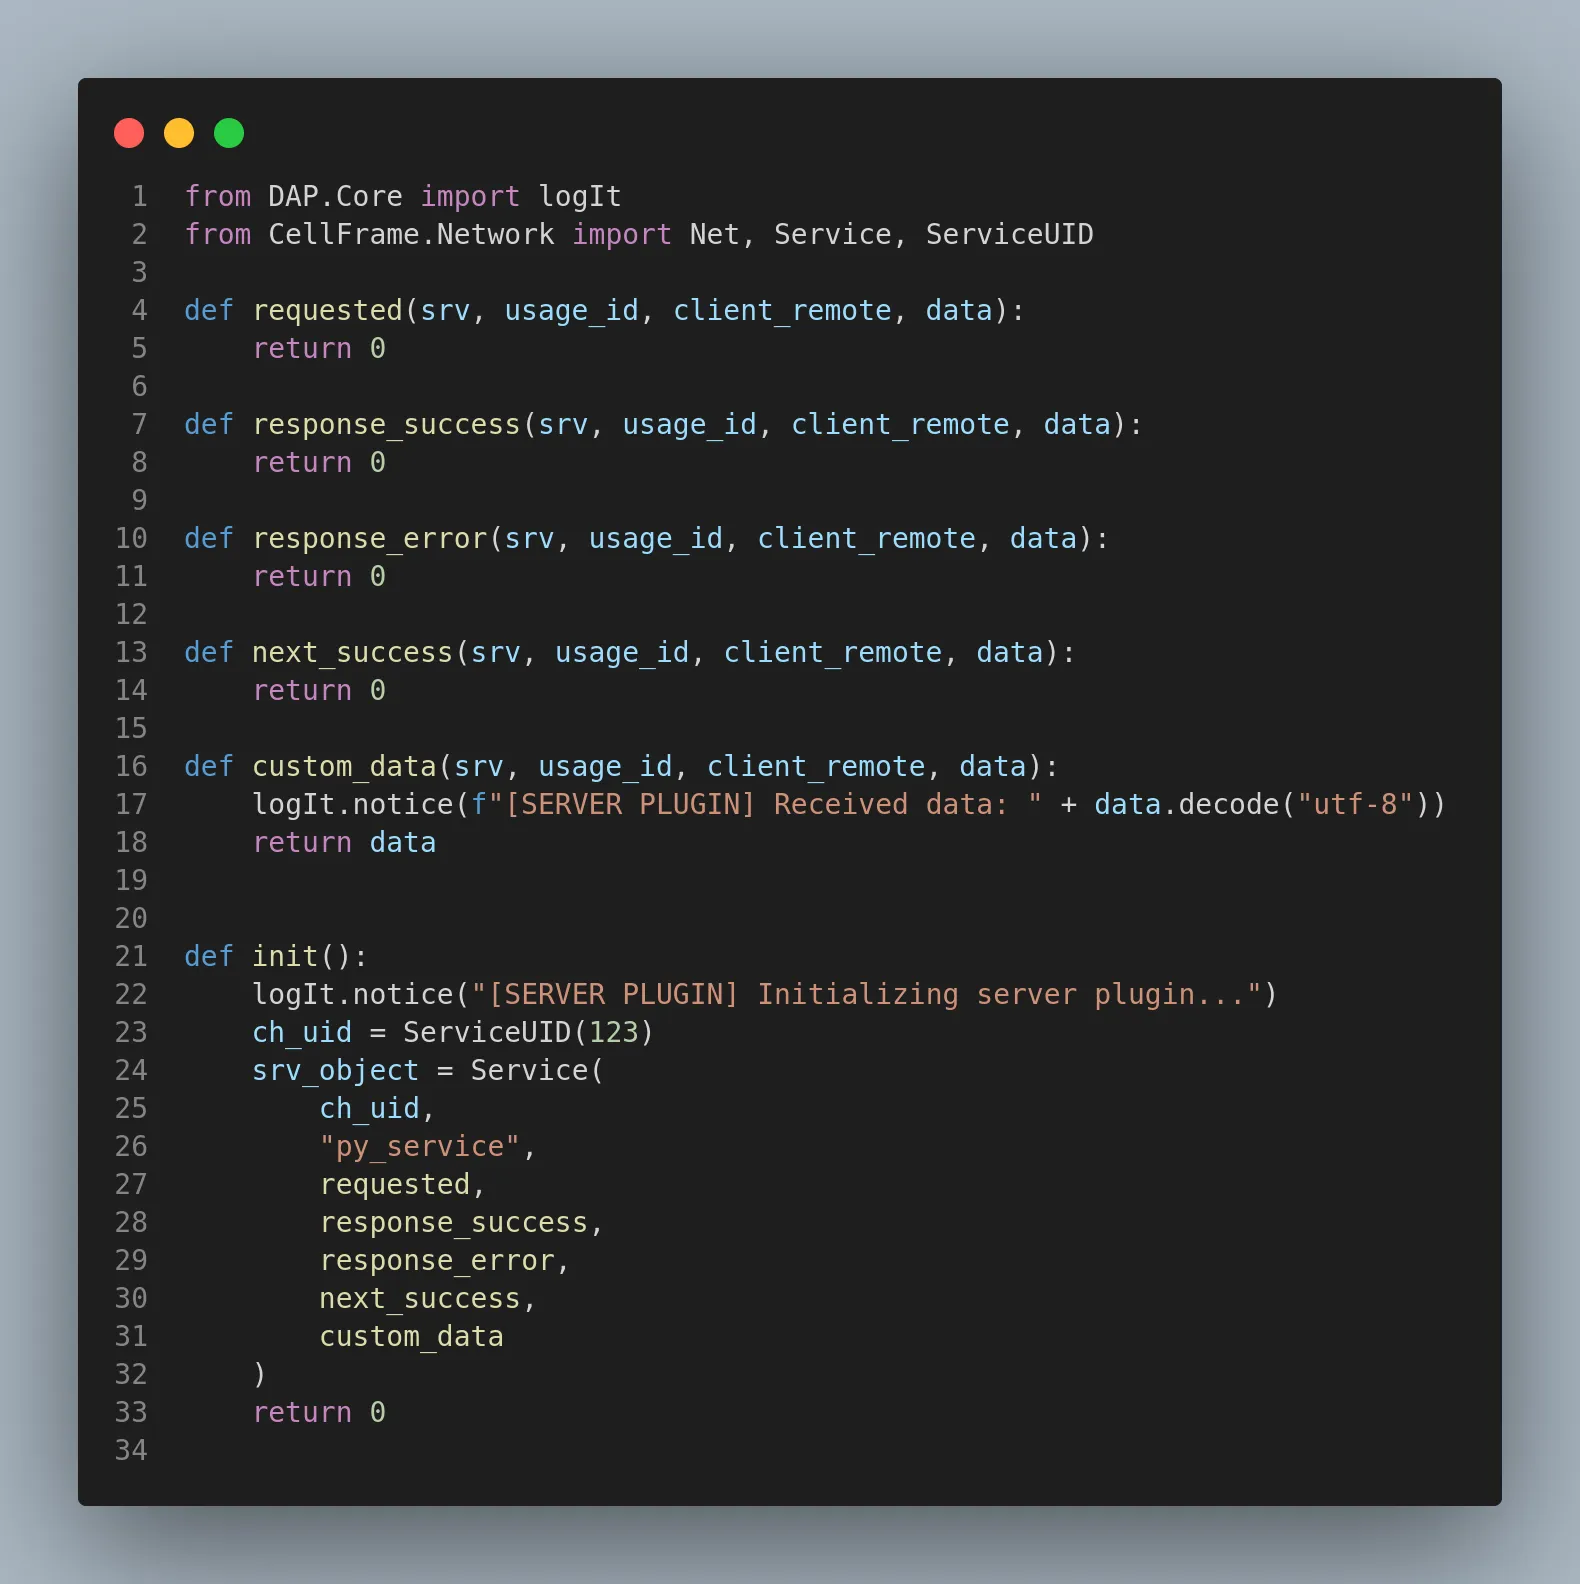
I have currently only modified the custom_data() function part in this plugin file. custom_data()
So looking at the logs after both of these plugins are running, would produce us something like:
[05/07/22-07:36:58] [ * ] [libdap-python] [CLIENT PLUGIN] Client connected...
[05/07/22-07:36:58] [ * ] [libdap-python] [CLIENT PLUGIN] sent data: Hello server!
[05/07/22-07:36:58] [ * ] [libdap-python] [SERVER PLUGIN] Received data: Hello server!
[05/07/22-07:36:58] [ * ] [libdap-python] [CLIENT PLUGIN] Received from server plugin: Hello server!
So the basic data flow between these plugins is working like it should.
Adding more features
Ok, now as the connection is working when init()
function is called, we might just modify the plugin a bit and add a
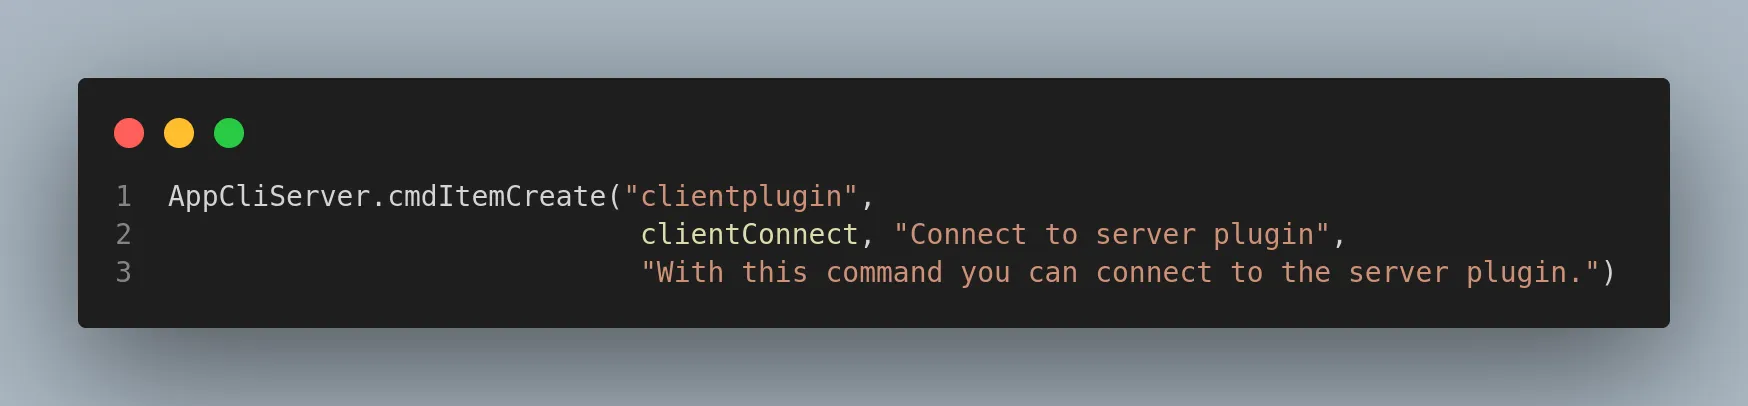
command which allows us to connect to the server plugin with cellframe-node-cli
We’ll simply use the method AppCliServer.cmdItemCreate()

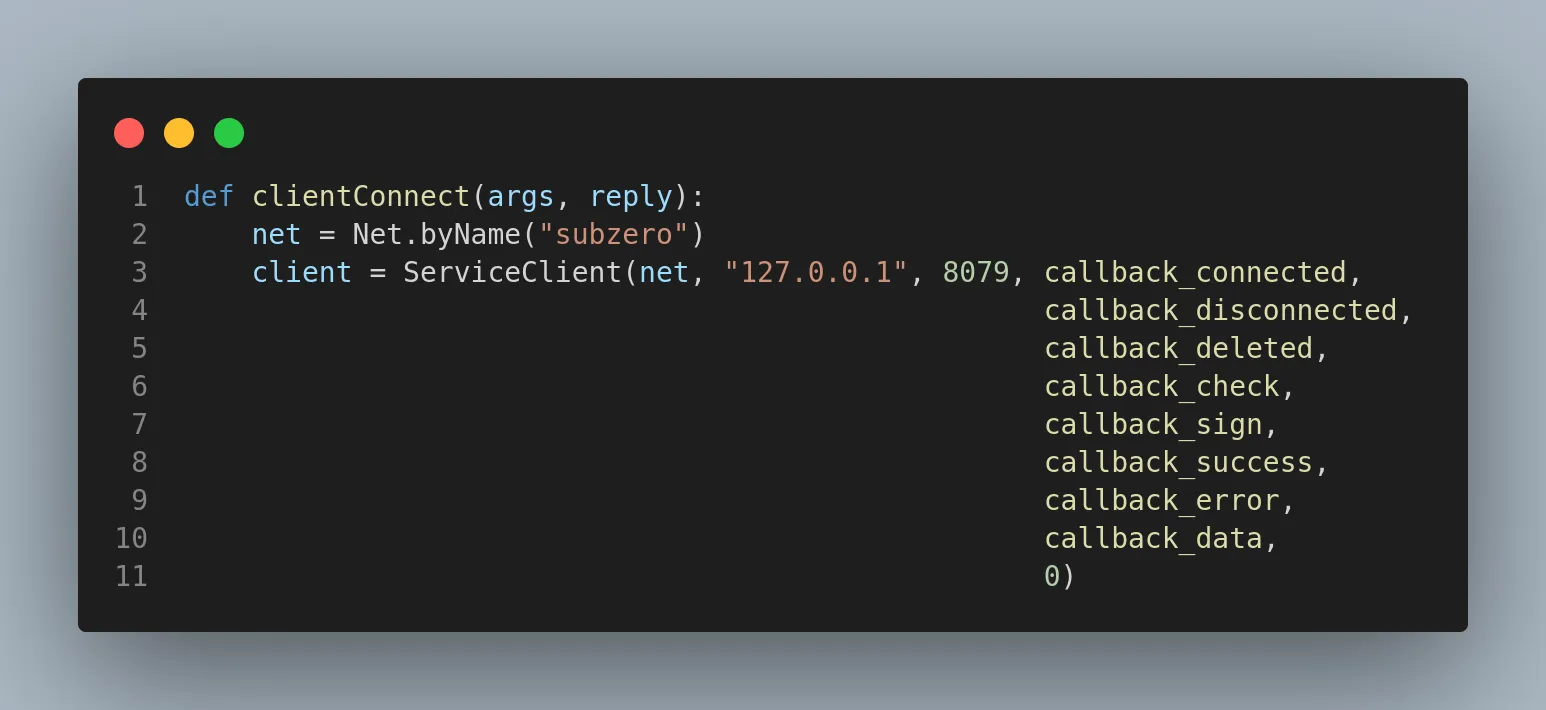
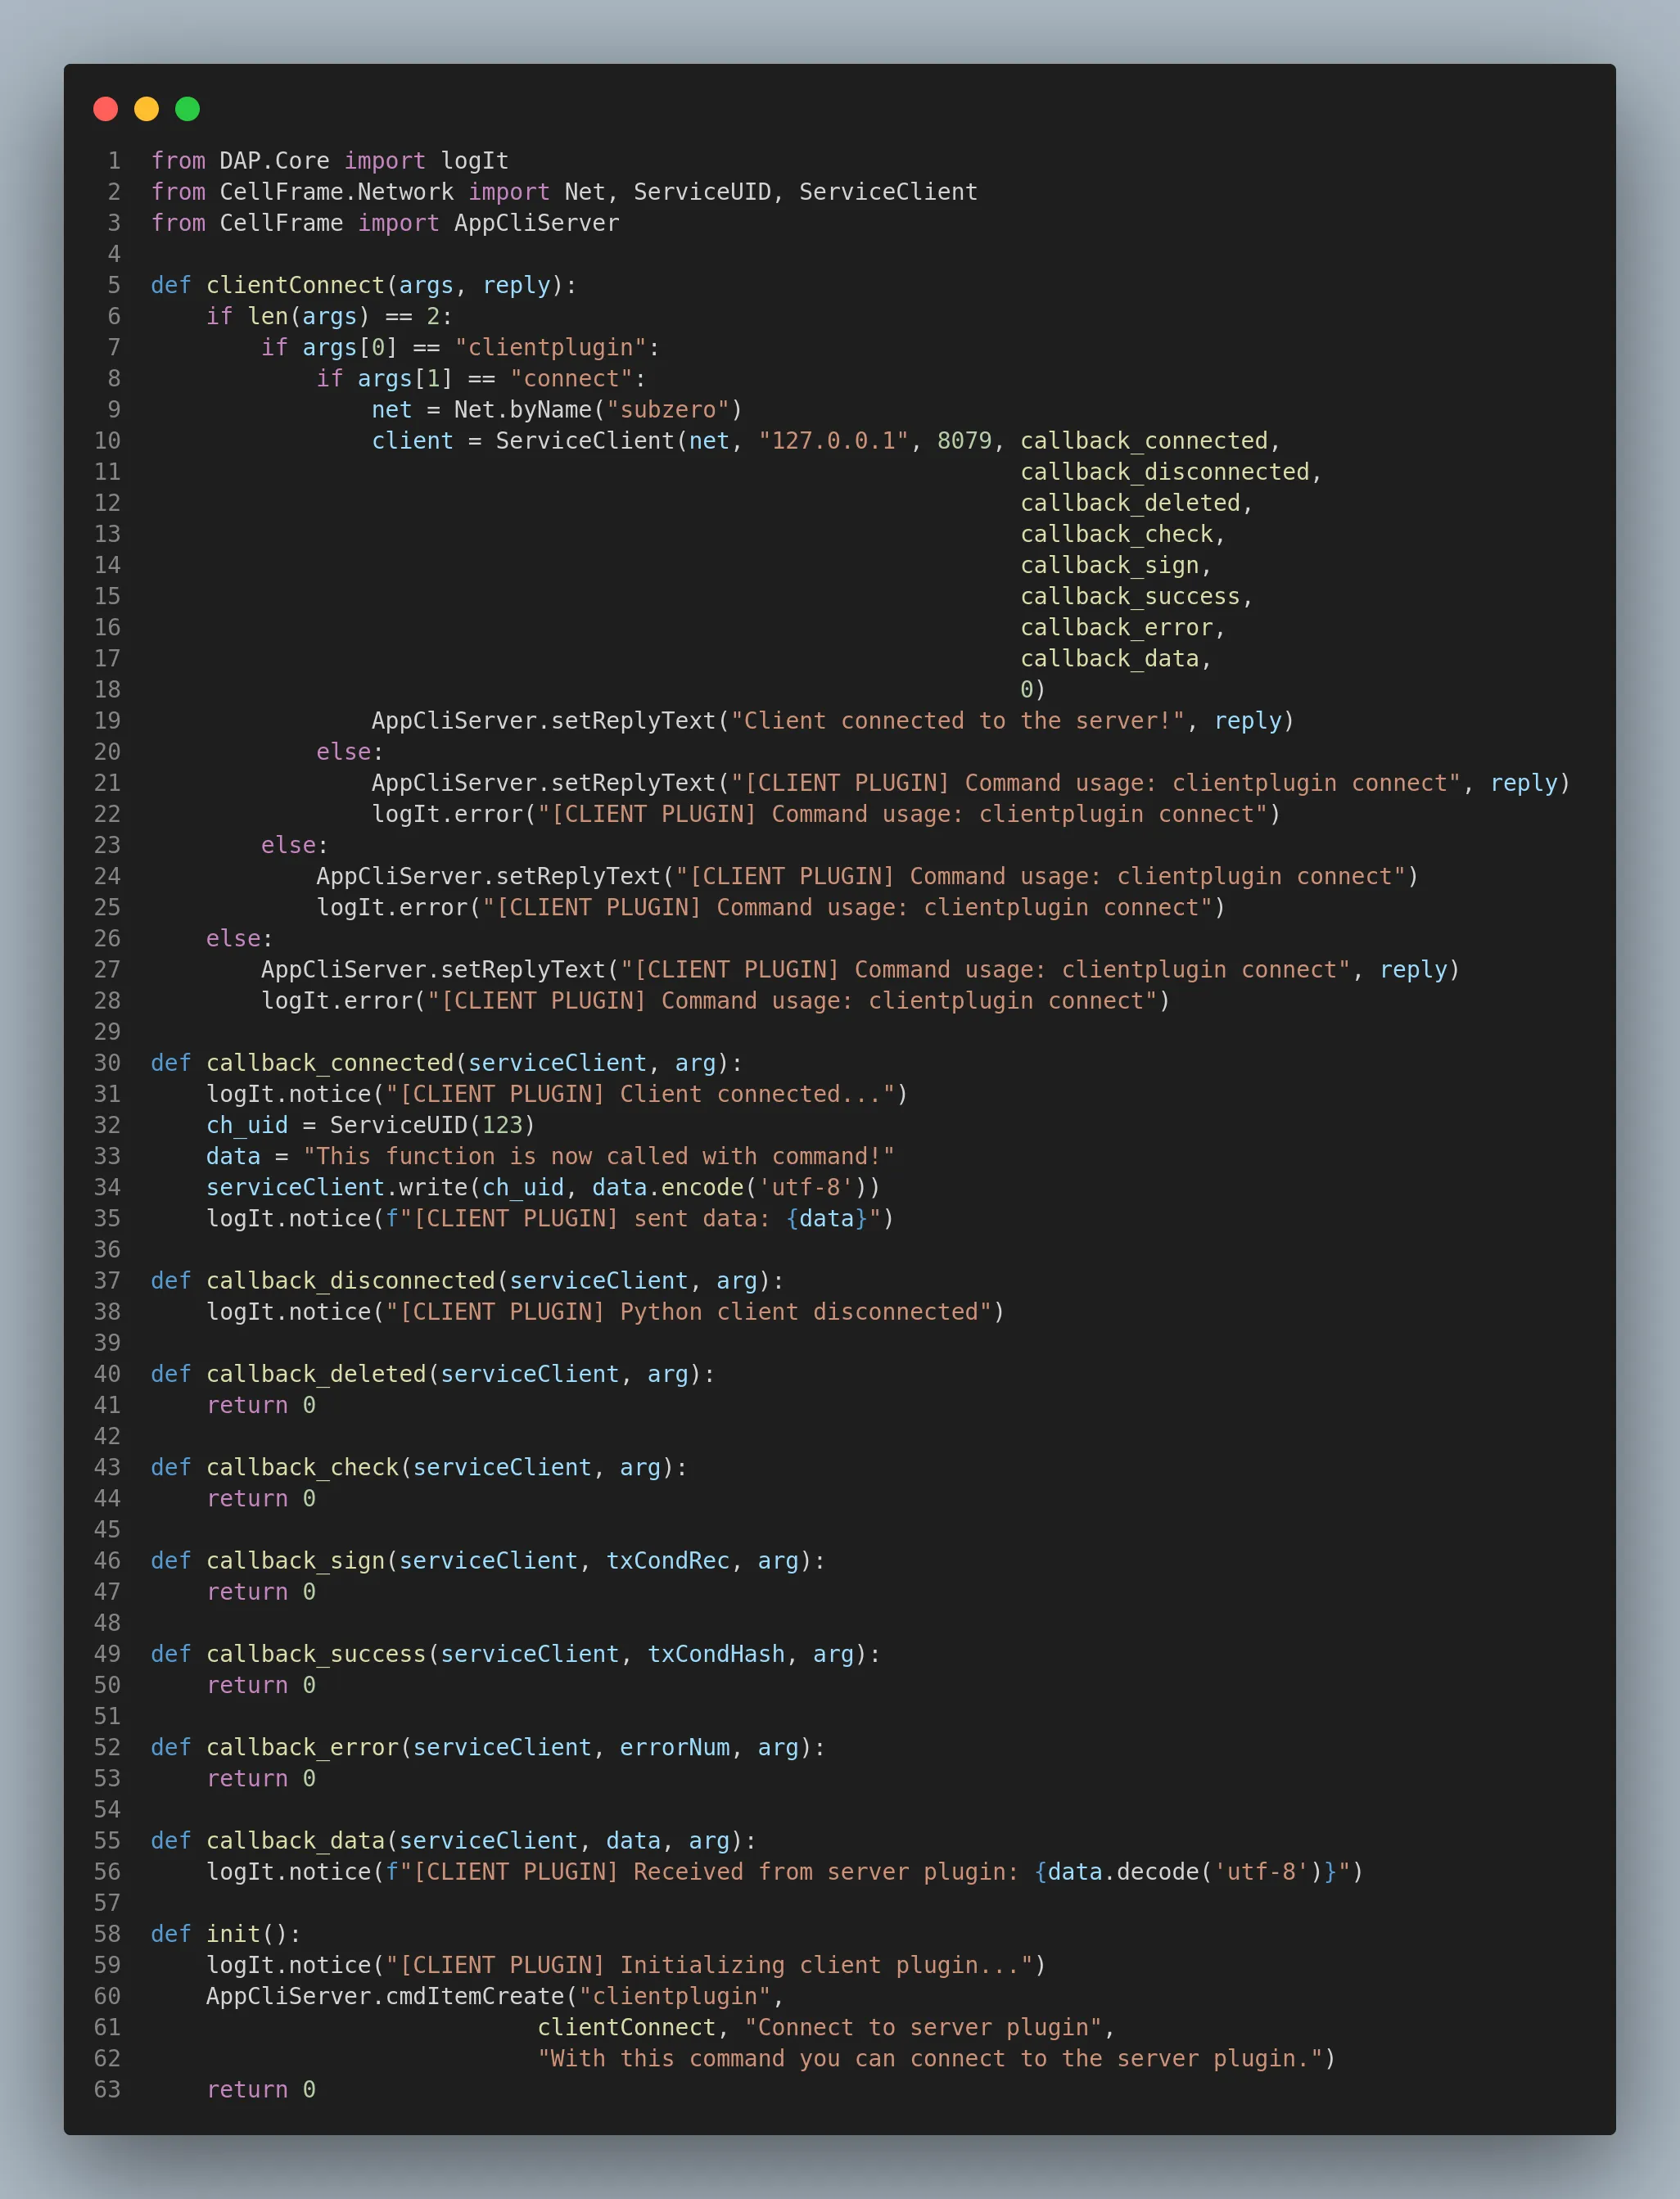
After that, we move the initialization of ServiceClient to the clientConnect() function we have created:

Now we can test the client connection with cellframe-node-cli clientplugin
Now this would be too simple to use a command just like this. Let’s just add couple of checks to the clientConnect()

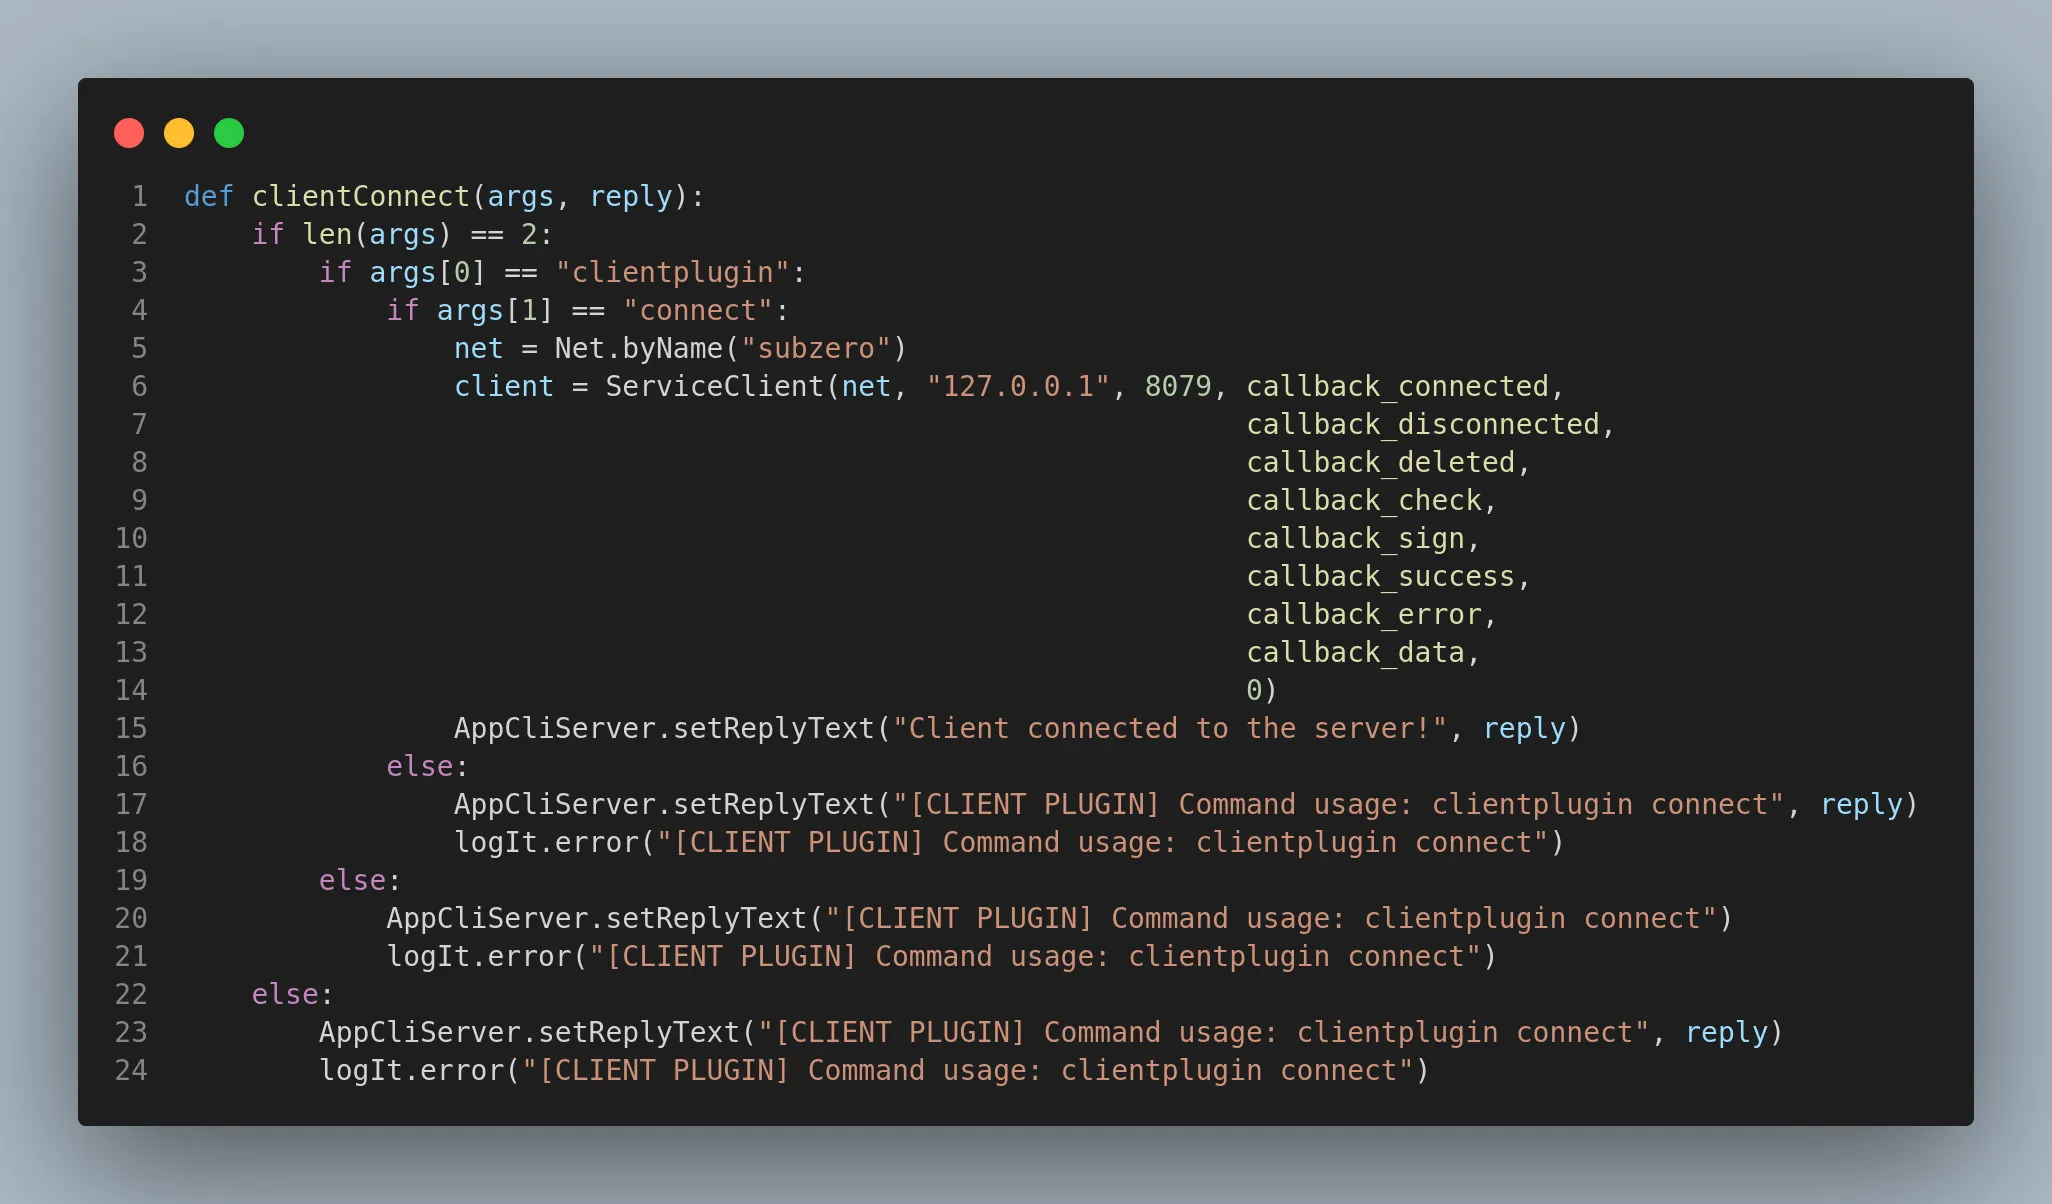
Now when you use the command cellframe-node-cli clientplugin connect ServiceClient
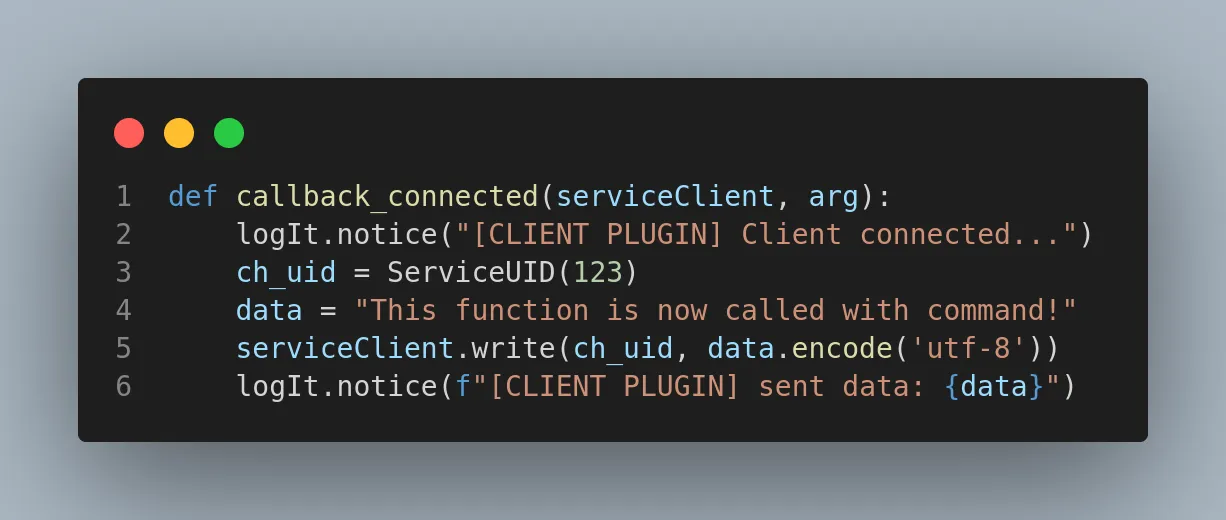
I also modified the callback_connected()

Now on logs we can see:
[05/07/22-10:36:04] [ * ] [libdap-python] [CLIENT PLUGIN] Client connected...
[05/07/22-10:36:04] [ * ] [libdap-python] [CLIENT PLUGIN] sent data: This function is now called with command![05/07/22-10:36:04] [ * ] [libdap-python] [SERVER PLUGIN] Received data: This function is now called with command!
[05/07/22-10:36:04] [ * ] [libdap-python] [CLIENT PLUGIN] Received from server plugin: This function is now called with command!
And when we use command cellframe-node-cli clientplugin connect
mika@cellframe:~$ cellframe-node-cli clientplugin connectClient connected to the server!
As we can see, it should be working.
After little bit of cleanup, here’s the final code for both:
Client part:

Server part:


Conclusion
All I can say at this point that this article is just a scratch of the surface.
There are millions of things which you can do with the powerful SDK builtin to the Cellframe ecosystem. You can write complete programs to do things which are impossible to do on a regular smart contracts.
I’m going deeper and deeper in this platform as soon as I get better understanding how things are actually working.
By the way, I’m hopeful that we will see some documentation soon for Cellframe Dashboard extensions too: The super application for Cellframe ecosystem.
Now that will be a completely different series of articles then…
Questions? Recommendations?
If you want to build something on the future of blockchains, join their development Telegram channel!
You can also contact me on Twitter or with Telegram.Sources of this tutorial are also available on my github.
Thank you for reading!
And huge thanks for all my Twitter followers for encouraging me to write more articles!
Recent news
-
Why You Should Build on the Cellframe Network
03 May 2022
-
AMA, April 4: News, major changes, and preparations for the mainnet launch
29 Apr 2022
-
Moscow Blockchain Life Forum Draws Thousands of Creators and Doles Out Inspiration
28 Apr 2022
-
Diving deeper into Cellframe: (Trying to) explain t-dApps
25 Apr 2022